Creating SVG Animation With Lottie
A simple example of how to animate a vector image on the web, which will be played by all modern browsers.
Designers often face the fact that if they create a cool icon / illustration on the site, it’s important to animate it exactly as it was intended. Many are afraid of the process itself, how can it be implemented independently without the involvement of a front-end specialist?
In this article you’ll find a simple example of how to animate a vector image on the web, which will be played by all modern browsers.
Requirements of programs and plugins: Sketch / Illustrator, Sketch2AE (plugin for transferring from Sketch 51.2 to After Effects), After Effects, Lottie (library for playing animation), Bodymovin (plugin for After Effects)
The structure of the article:
- Create a simple object to understand the principle of operation;
- Animate the shape in Adobe After Effects, a quick walkthrough;
- What is Lottie and Bodymovin, and how they work;
- Transfer the archive with files to the frontend developer for posting on the site;
- Confines.
Create a simple figure to understand how it works
Go to the Sketch / Illustrator and create the desired image. For clarity and ease of understanding, I’ll show you the whole process really simply. I prefer to work in Sketch, so I’ll show the further process using this program.
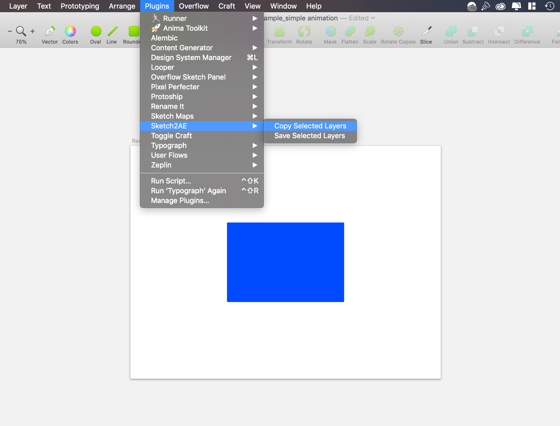
Create a rectangle:

Select the artboard with the file and the menu in the Plugins section, find the Sketch2AE and copy to the clipboard:
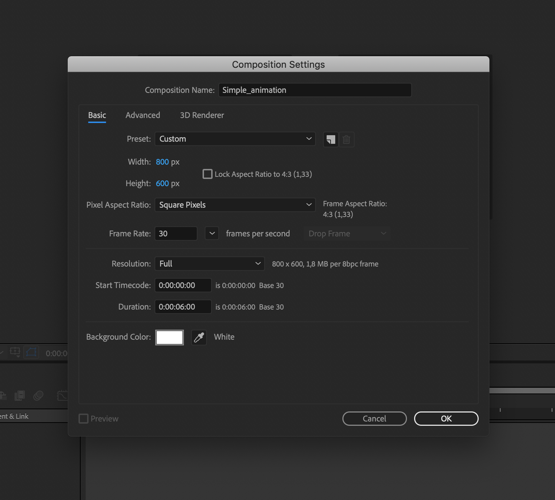
Next, go to the After Effects to create a project and enter the size of the composition so that it matches the size of your artboard (I took 800x600):
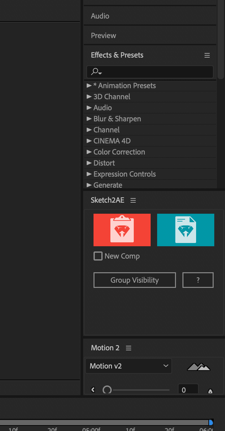
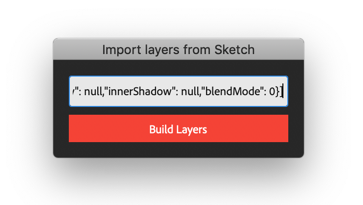
After you have created a project, on the right in the side menu you will see the Sketch2AE plugin, in which you need to select the left red block:
And paste the copied code (Cmnd/Ctrl + V)
After that, your artboard with the image displays on the screen:

There are two ways to import illustration into After Effects:
- Directly through Illustrator - drag and drop the *.ai file format into the After Effects project. All drawn shapes that will be animated need to be made layers For convenience, it is desirable to rename the layers so as not to be confused (in particular, this applies to large and complex animations);
- Via Sketch, using the Sketch2EA plugin (the site has a detailed guide on how to install it); More detailed information about how to prepare the layout for transfer to After Effects, you can find on Youtube.
Animation of a figure in After Effects, a quick walkthrough
After we managed to transfer our layout with the image in After Effects, let's proceed to the animation. I will show you how to rotate an object and change its transparency.
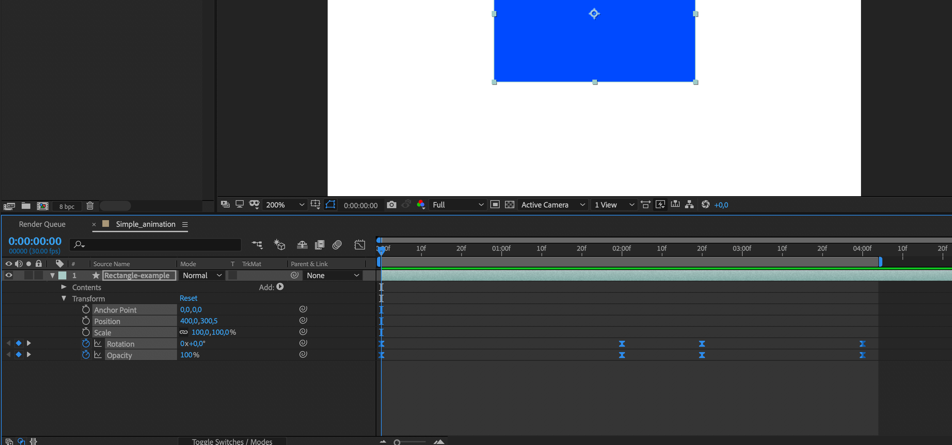
Let's start by turning 90 degrees. Expand layer properties and find Rotation and Opacity there. At the initial position of the timeline, we set 0 degrees and 100% opacity, we fix them with the key, using the icon to the left of the properties (as a stopwatch), then shift the values on the timeline to 01: 00f and set the rotation properties to 90 degrees and change the transparency 30-40%:
To make the object return to its original position, copy the initial keys in the timeline and set them at the end point, until which it will return to the initial position:
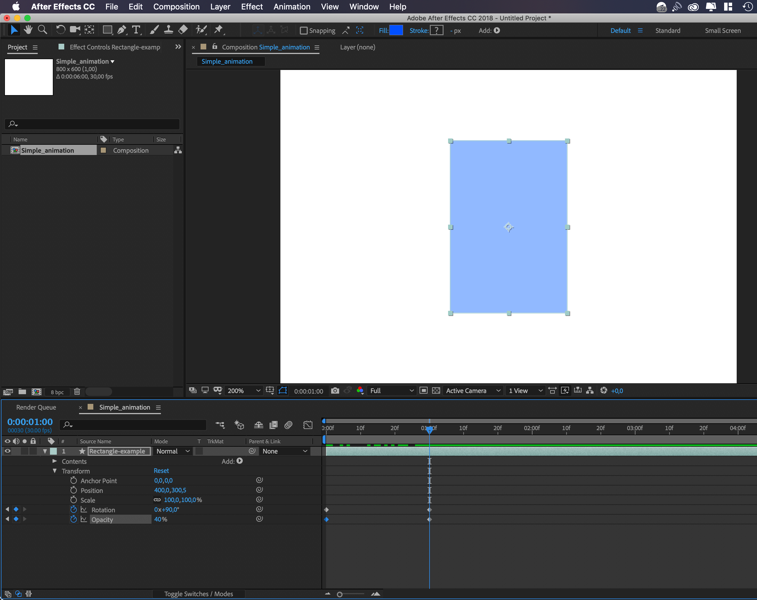
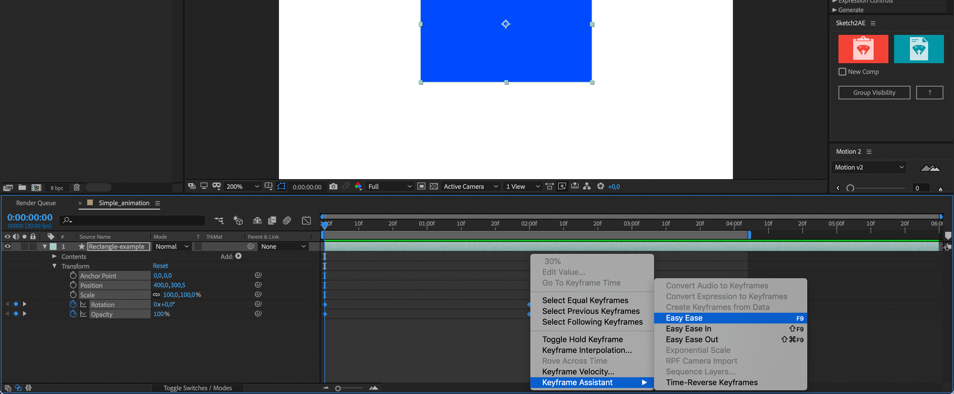
Moreover, you can adjust the smoothness of your animation, using ising. Select all the keys on the timeline and click the right mouse button, then select the appropriate smoothness (I stopped at Easy Ease):
Here's what we got (there will be a video / gif here):
What are Lottie and Bodymovin
Thus, the main part of the work we’ve done, we just need to figure out how to still make our illustration work. We will understand the plugins that will help us in this.
Lottieis an iOS, Android, and React Native library that renders After Effects animations in real time, allowing apps to use animations as easily as they use static images.
Bodymovinis a plugin for After Effects that can export animation in json data format for Lottie to use.
Here is detailed and accessible description of how to connect a library that will play the animation:
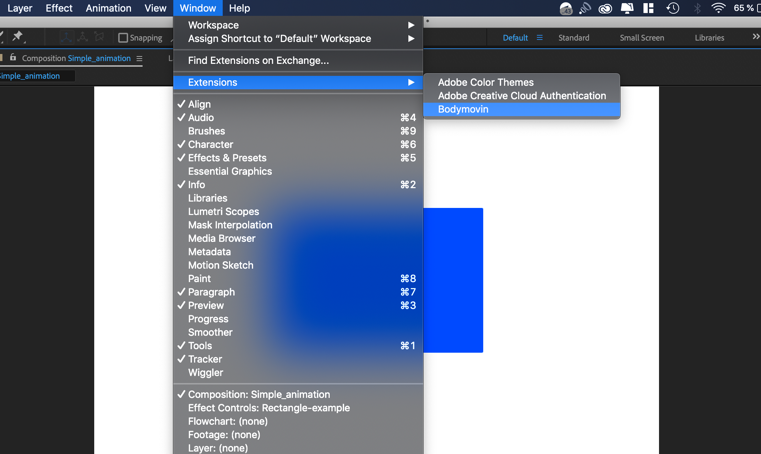
And we will continue to prepare our file for further work. Having finished with animation of our object, we switch to the tab Window – Extensions – Bodymovin:
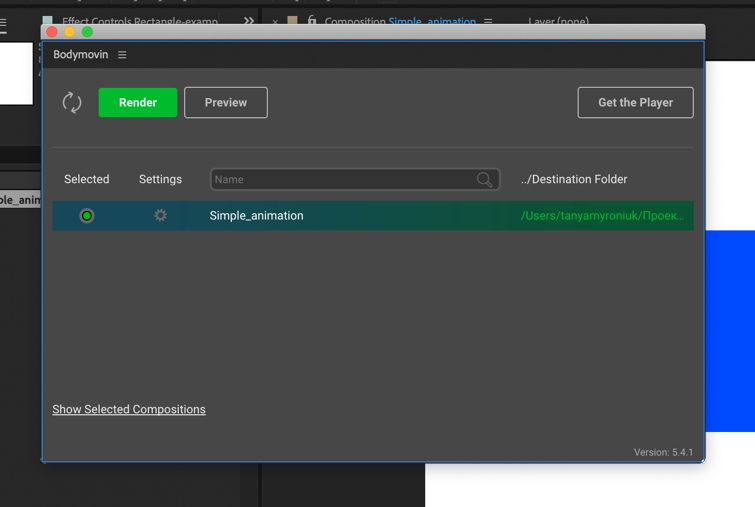
Select our file and set the path where the *.json file will be saved:
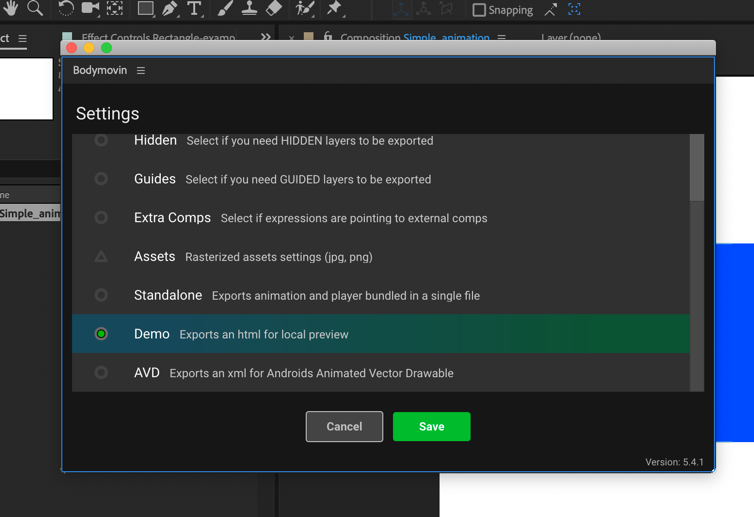
Then in the settings we remove the Glyphs checkbox (it is needed only when there are fonts in our layout, which it automatically translates into curves), and set the Demo to be able to see the work in the browser:
And start rendering:
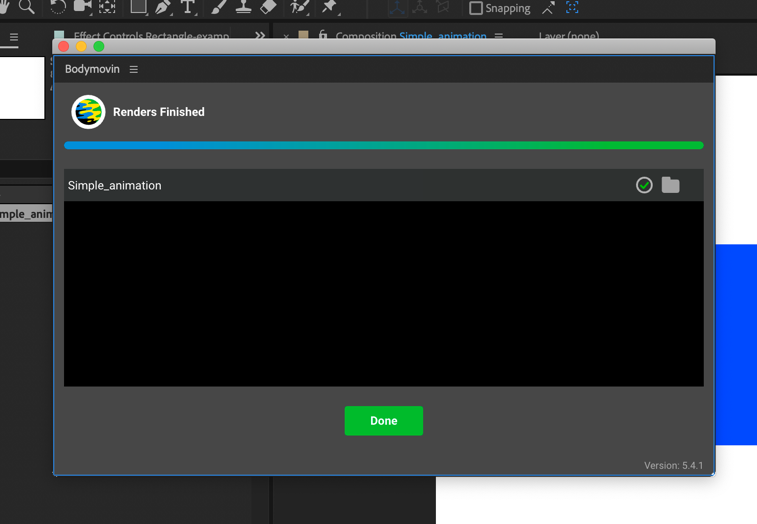
Done!
Transfer archive file frontend developer to place on the site
Voila! Now you have a *.json file that you only need to pass to the developer. Together with him, you give him links describing how to connect a library that will play the animation:
http://airbnb.io/lottie/web/web.htmlhttps://github.com/airbnb/lottie-android
Confines
This method has a number of limitations in the work, the main ones:
- work with gradients (problems may arise);
- works only with vector images (although it can pull png and jpg)
- does not support any effects, therefore you need to create your animation with simple methods;
- use Alpha matte and Alpha inverted matte as little as possible (it is better to use masks instead of them);
- use as few points as possible in masks and keyframes on such masks;
Detailed restrictions can be found on the Lottie and Bodymovin official website.
Final json file:
{"v":"5.4.1","fr":30,"ip":0,"op":124,"w":800,"h":600,"nm":"Simple_animation","ddd":0,"assets":[],"layers":[{"ddd":0,"ind":1,"ty":4,"nm":"Rectangle-example","sr":1,"ks":{"o":{"a":1,"k":[{"i":{"x":[0.667],"y":[1]},"o":{"x":[0.333],"y":[0]},"n":["0p667_1_0p333_0"],"t":0,"s":[100],"e":[30]},{"i":{"x":[0.667],"y":[1]},"o":{"x":[0.333],"y":[0]},"n":["0p667_1_0p333_0"],"t":60,"s":[30],"e":[30]},{"i":{"x":[0.667],"y":[1]},"o":{"x":[0.333],"y":[0]},"n":["0p667_1_0p333_0"],"t":80,"s":[30],"e":[100]},{"t":120}],"ix":11},"r":{"a":1,"k":[{"i":{"x":[0.667],"y":[1]},"o":{"x":[0.333],"y":[0]},"n":["0p667_1_0p333_0"],"t":0,"s":[0],"e":[90]},{"i":{"x":[0.667],"y":[1]},"o":{"x":[0.333],"y":[0]},"n":["0p667_1_0p333_0"],"t":60,"s":[90],"e":[90]},{"i":{"x":[0.667],"y":[1]},"o":{"x":[0.333],"y":[0]},"n":["0p667_1_0p333_0"],"t":80,"s":[90],"e":[0]},{"t":120}],"ix":10},"p":{"a":0,"k":[400,300.5,0],"ix":2},"a":{"a":0,"k":[0,0,0],"ix":1},"s":{"a":0,"k":[100,100,100],"ix":6}},"ao":0,"shapes":[{"ty":"gr","it":[{"ty":"rc","d":1,"s":{"a":0,"k":[302,205],"ix":2},"p":{"a":0,"k":[0,0],"ix":3},"r":{"a":0,"k":2,"ix":4},"nm":"Rectangle Path 1","mn":"ADBE Vector Shape - Rect","hd":false},{"ty":"fl","c":{"a":0,"k":[0,0.30980399251,1,1],"ix":4},"o":{"a":0,"k":100,"ix":5},"r":1,"nm":"Fill 1","mn":"ADBE Vector Graphic - Fill","hd":false},{"ty":"tr","p":{"a":0,"k":[0,0],"ix":2},"a":{"a":0,"k":[0,0],"ix":1},"s":{"a":0,"k":[100,100],"ix":3},"r":{"a":0,"k":0,"ix":6},"o":{"a":0,"k":100,"ix":7},"sk":{"a":0,"k":0,"ix":4},"sa":{"a":0,"k":0,"ix":5},"nm":"Transform"}],"nm":"Rectangle-example","np":2,"cix":2,"ix":1,"mn":"ADBE Vector Group","hd":false}],"ip":0,"op":180,"st":0,"bm":0}],"markers":[]}Final results
Final json file:
{"v":"5.4.1","fr":30,"ip":0,"op":124,"w":800,"h":600,"nm":"Simple_animation","ddd":0,"assets":[],"layers":[{"ddd":0,"ind":1,"ty":4,"nm":"Rectangle-example","sr":1,"ks":{"o":{"a":1,"k":[{"i":{"x":[0.667],"y":[1]},"o":{"x":[0.333],"y":[0]},"n":["0p667_1_0p333_0"],"t":0,"s":[100],"e":[30]},{"i":{"x":[0.667],"y":[1]},"o":{"x":[0.333],"y":[0]},"n":["0p667_1_0p333_0"],"t":60,"s":[30],"e":[30]},{"i":{"x":[0.667],"y":[1]},"o":{"x":[0.333],"y":[0]},"n":["0p667_1_0p333_0"],"t":80,"s":[30],"e":[100]},{"t":120}],"ix":11},"r":{"a":1,"k":[{"i":{"x":[0.667],"y":[1]},"o":{"x":[0.333],"y":[0]},"n":["0p667_1_0p333_0"],"t":0,"s":[0],"e":[90]},{"i":{"x":[0.667],"y":[1]},"o":{"x":[0.333],"y":[0]},"n":["0p667_1_0p333_0"],"t":60,"s":[90],"e":[90]},{"i":{"x":[0.667],"y":[1]},"o":{"x":[0.333],"y":[0]},"n":["0p667_1_0p333_0"],"t":80,"s":[90],"e":[0]},{"t":120}],"ix":10},"p":{"a":0,"k":[400,300.5,0],"ix":2},"a":{"a":0,"k":[0,0,0],"ix":1},"s":{"a":0,"k":[100,100,100],"ix":6}},"ao":0,"shapes":[{"ty":"gr","it":[{"ty":"rc","d":1,"s":{"a":0,"k":[302,205],"ix":2},"p":{"a":0,"k":[0,0],"ix":3},"r":{"a":0,"k":2,"ix":4},"nm":"Rectangle Path 1","mn":"ADBE Vector Shape - Rect","hd":false},{"ty":"fl","c":{"a":0,"k":[0,0.30980399251,1,1],"ix":4},"o":{"a":0,"k":100,"ix":5},"r":1,"nm":"Fill 1","mn":"ADBE Vector Graphic - Fill","hd":false},{"ty":"tr","p":{"a":0,"k":[0,0],"ix":2},"a":{"a":0,"k":[0,0],"ix":1},"s":{"a":0,"k":[100,100],"ix":3},"r":{"a":0,"k":0,"ix":6},"o":{"a":0,"k":100,"ix":7},"sk":{"a":0,"k":0,"ix":4},"sa":{"a":0,"k":0,"ix":5},"nm":"Transform"}],"nm":"Rectangle-example","np":2,"cix":2,"ix":1,"mn":"ADBE Vector Group","hd":false}],"ip":0,"op":180,"st":0,"bm":0}],"markers":[]}Final html result:
you can open standalone file here
Thanks for reading!
I hope my experience will help you in promoting your design activities.